
A 'Small Sugar' pumpkin growing on the vine
Pumpkin pie tastes better with fresh mash made the old-fashioned way. The effort is small and the results worth it. Even better, the texture and flavor of your pie will be different depending on the pie-pumpkin variety you choose. For example, the famous 'Winter Luxury' pumpkin yields a mild, smooth, sweet mash for sensational pies. The popular 'Baby Pam' and 'Small Sugar' are easy-to-find, smooth, sweet, small, pumpkins that have a rich, classic pumpkin taste. The heirloom 'New England Pie' is a medium to small classic pumpkin with very sweet, flavorful flesh, and 'Long Pie' pumpkin is an unusual, elongated pumpkin that keeps forever and is very sweet.

The super sweet pie pumpkin 'Winter Luxury' is a poor keeper but makes amazing pie. It's is a beautiful medium to small pumpkin with thin, netted skin and dense, sweet, orange flesh
There are two recommended methods for preparing pumpkin mash for pie, roasting or steaming. Both yield very different pies. Roasted mash has less water and is stronger in flavor while steamed mash makes more tender, delicate pies. I prefer the steaming method. Some recommend boiling pumpkin, but this leaches out vitamins and antioxidants, which is a waste.
Steaming is very easy. Begin by cutting the pumpkins evenly in half and cleaning out the seeds. (Be sure to put the seeds aside for roasting!) Place the halves in a large steaming pan face down. The pan should be filled with two to three inches of water. Cover the halves, bring to a rolling boil and then take the heat down to a low boil and allow them to steam for 20 minutes or until the pumpkin is soft. Allow the halves to cool.
The method for roasting is similar, but in this case the pumpkin halves are placed upside down onto parchment paper or a lightly oiled sheet pan. Place the halves in an oven preheated to 350 degrees Fahrenheit and roast for around 30 minutes or until fork-tender. The inverted pumpkins will steam and stay moist in the oven.
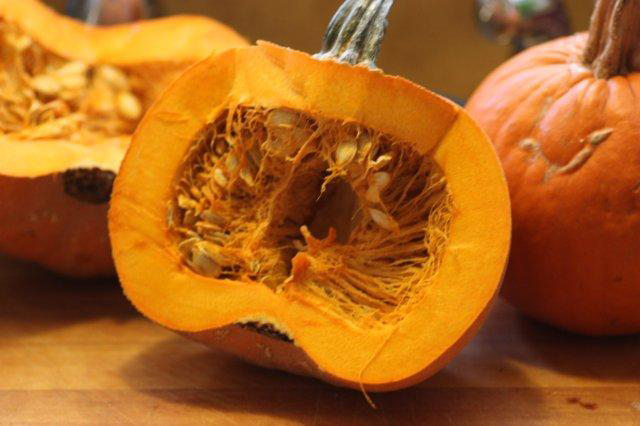
This 'Winter Luxury' pumpkin half needs to be cleaned and the seeds saved for roasting.

These inverted pumpkin halves are ready to roast or steam.
After cooking and cooling, scoop the pumpkin shells out and put the flesh in a blender or food processor and process it until smooth. This should take a minute or two. Now the mash is pie-ready.

The pumpkin should be completely soft and easily scooped when fully cooked.

A blender or food processor is the best way to make doubly sure your mash is perfectly smooth.
Pumpkin pie filling is lightest if blended in a food processor or blender, so be sure to keep yours on hand for making this pie.
Rich Pumpkin Pie
Ingredients
3/4 cup white sugar
1 teaspoon ground cinnamon
1/2 teaspoon salt
1/2 teaspoon ground ginger
1/4 teaspoon ground cloves
1/4 teaspoon ground nutmeg
2 large eggs (room temperature)
2 cups smooth pumpkin mash
1 cup evaporated milk, half-and-half or heavy cream
1 prebaked 9-inch deep-dish pie shell (Makes one pie)
Directions
Preheat the oven to 350 degrees Fahrenheit. Throw all the spices and wet ingredients into the blender and blend until smooth and well-mixed. Pour into a prebaked pie shell and bake for around 45 to 50 minutes or until the pie's custard center is no longer jiggly; you should be able to insert a toothpick in the center and have it come out clean. Once you can smell the pie, it's time to check it. Once the pie is cool, cut a slice and hit it with a mountain of fresh whipped cream.

Bake the pies until firm and fragrant.

The completed pumpkin pie among other Thanksgiving desserts.


