Monarch Migration

The Monarchs (Danaus plexippus) came late this year, but at least they came. They first appeared in my Delaware garden in mid August and by late August my milkweeds (Asclepias spp.) were being quickly skeletonized by their voracious caterpillars. It's the chief reason I grow milkweed. The chrysalises that followed hung from the plants like green jewels.

Now the Monarchs are on the move trying to beat the frost. They fly South traveling between 50 and 100 miles a day. Those along the East Coast fly to the Sierra Madre Mountains of Mexico where winters are mild. The nights have been cold, so some won't make it.

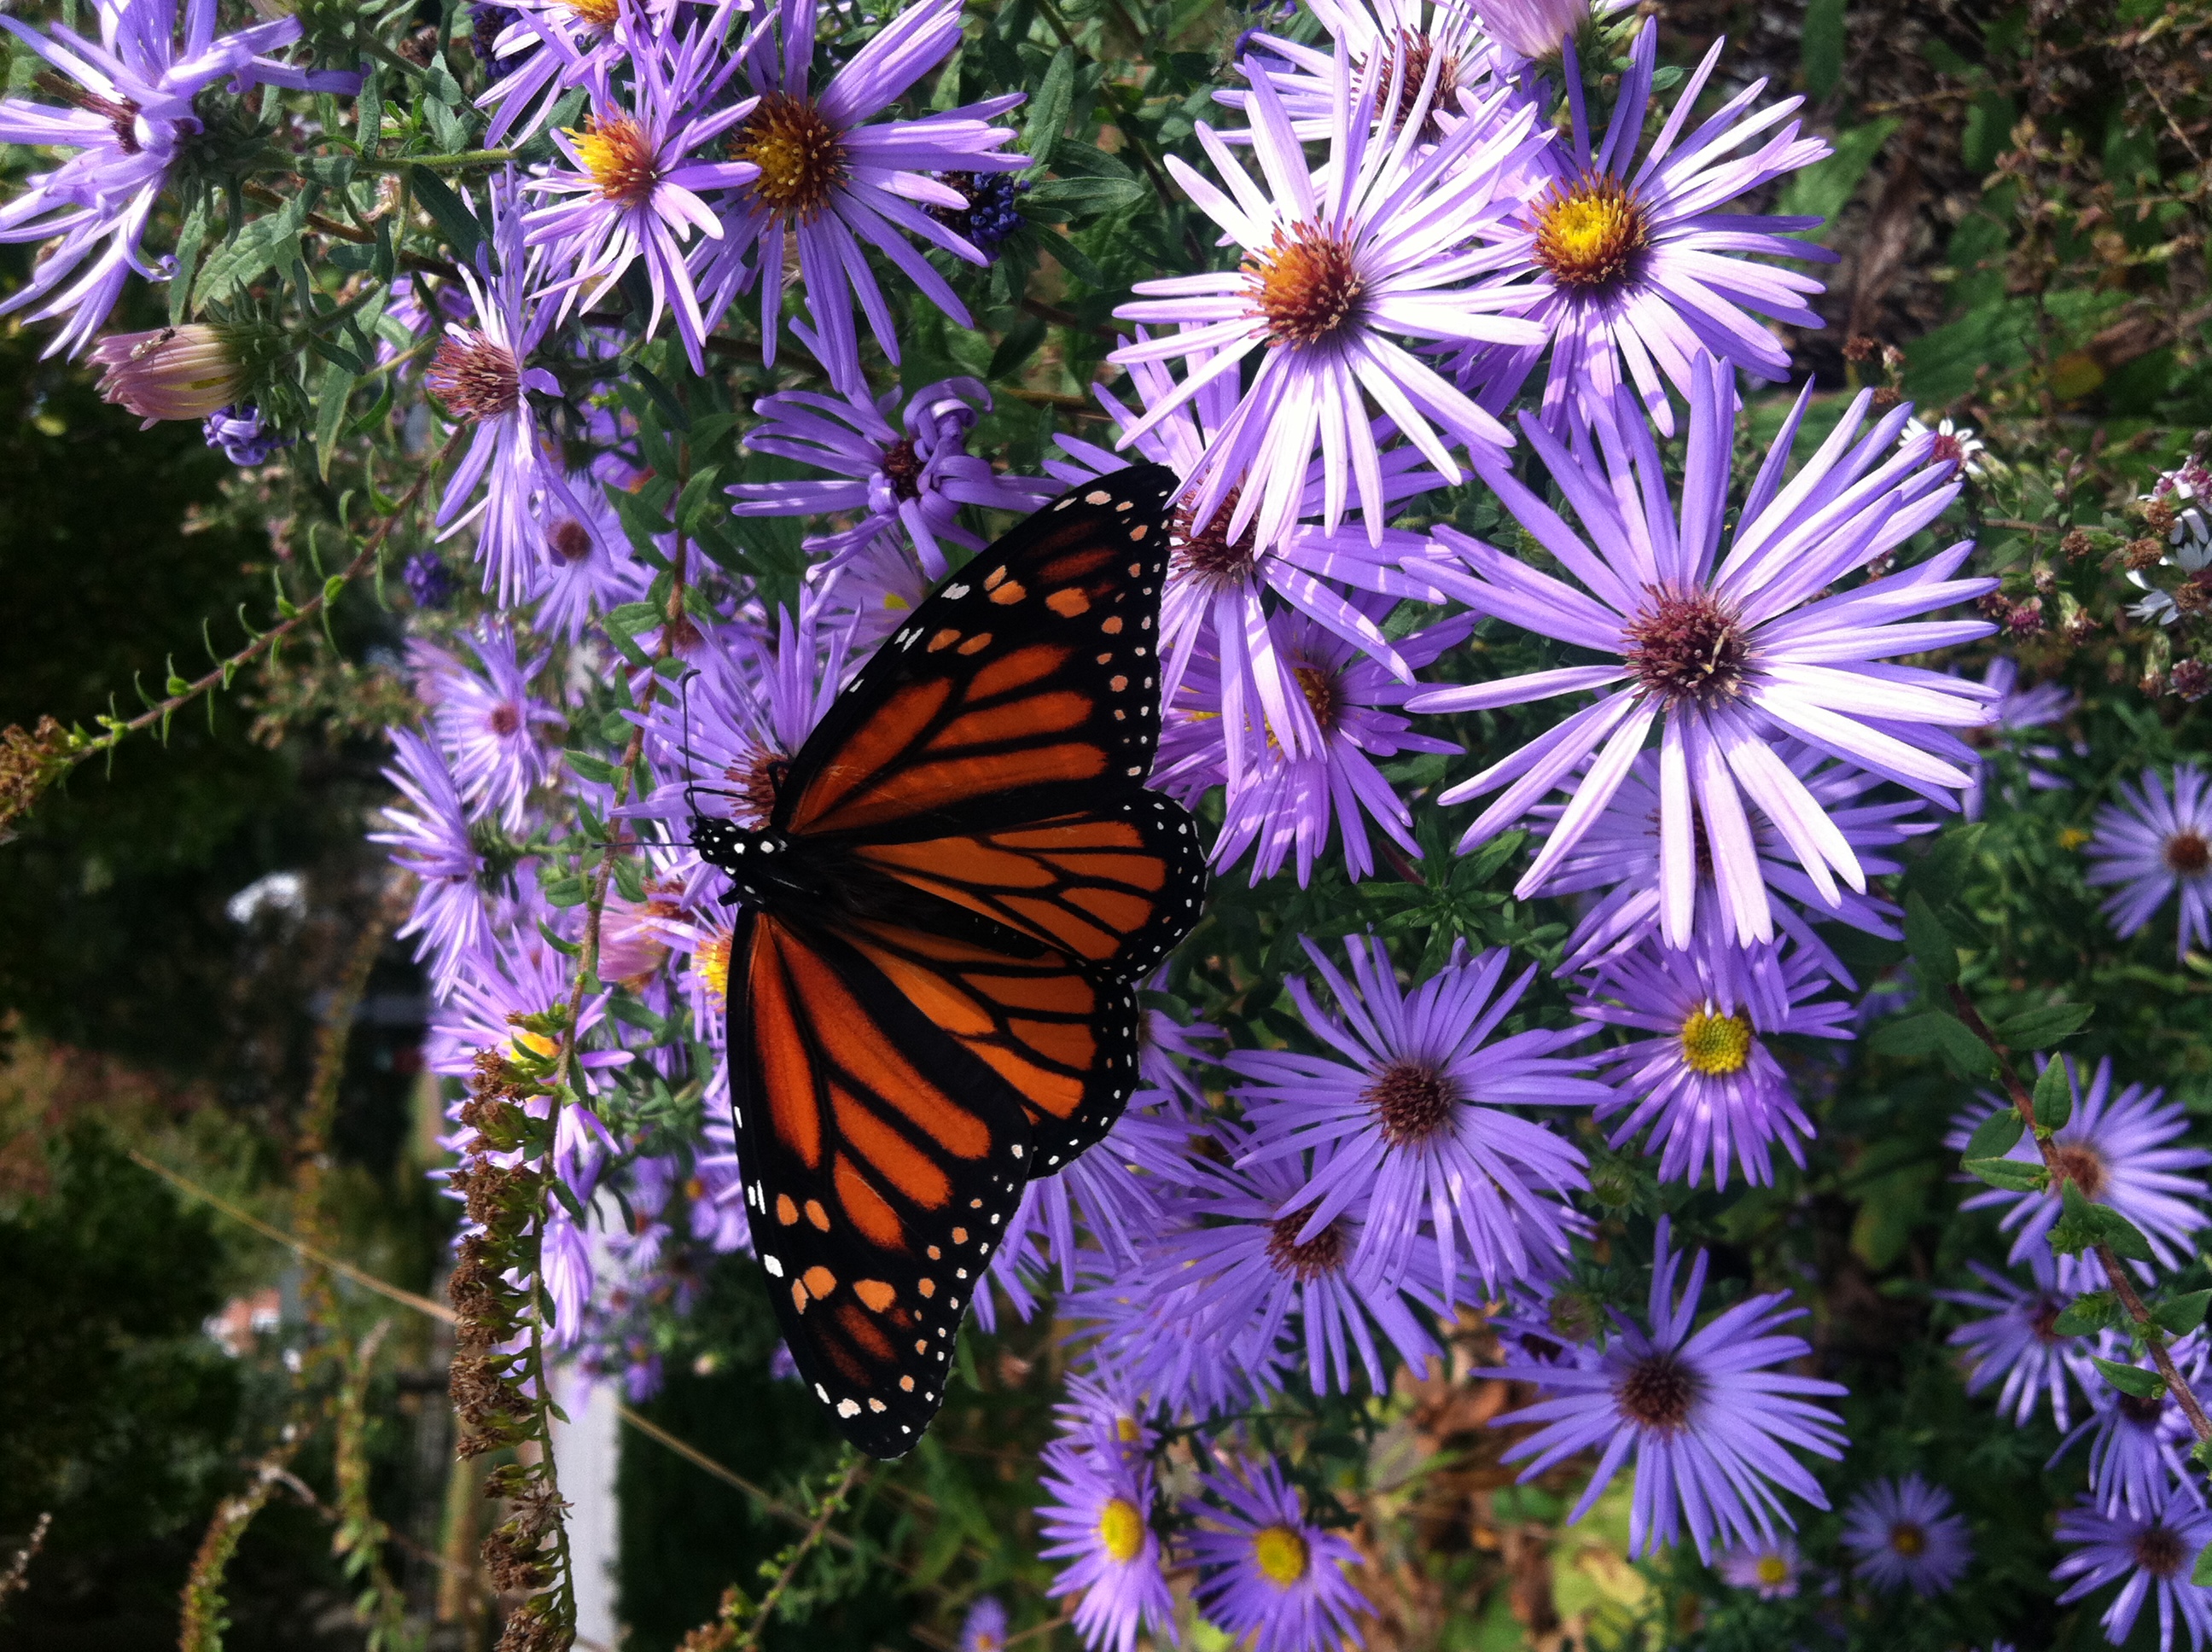
This photo was taken today ( 10-20-14)--October Skies Aster with Monarch. These sure signs of fall make my heart both happy and sad. So many bright colors precede the cold, gray November and white months that follow.

DIY Homemade Fresh Pumpkin Pie

A 'Small Sugar' pumpkin growing on the vine

A 'Small Sugar' pumpkin growing on the vine

Pumpkin pie tastes better with fresh mash made the old-fashioned way. The effort is small and the results worth it. Even better, the texture and flavor of your pie will be different depending on the pie-pumpkin variety you choose. For example, the famous 'Winter Luxury' pumpkin yields a mild, smooth, sweet mash for sensational pies. The popular 'Baby Pam' and 'Small Sugar' are easy-to-find, smooth, sweet, small, pumpkins that have a rich, classic pumpkin taste. The heirloom 'New England Pie' is a medium to small classic pumpkin with very sweet, flavorful flesh, and 'Long Pie' pumpkin is an unusual, elongated pumpkin that keeps forever and is very sweet.

The super sweet pie pumpkin 'Winter Luxury' is a poor keeper but makes amazing pie. It's is a beautiful medium to small pumpkin with thin, netted skin and dense, sweet, orange flesh

The super sweet pie pumpkin 'Winter Luxury' is a poor keeper but makes amazing pie. It's is a beautiful medium to small pumpkin with thin, netted skin and dense, sweet, orange flesh

There are two recommended methods for preparing pumpkin mash for pie, roasting or steaming. Both yield very different pies. Roasted mash has less water and is stronger in flavor while steamed mash makes more tender, delicate pies. I prefer the steaming method. Some recommend boiling pumpkin, but this leaches out vitamins and antioxidants, which is a waste.

Steaming is very easy. Begin by cutting the pumpkins evenly in half and cleaning out the seeds. (Be sure to put the seeds aside for roasting!) Place the halves in a large steaming pan face down. The pan should be filled with two to three inches of water. Cover the halves, bring to a rolling boil and then take the heat down to a low boil and allow them to steam for 20 minutes or until the pumpkin is soft. Allow the halves to cool.

The method for roasting is similar, but in this case the pumpkin halves are placed upside down onto parchment paper or a lightly oiled sheet pan. Place the halves in an oven preheated to 350 degrees Fahrenheit and roast for around 30 minutes or until fork-tender. The inverted pumpkins will steam and stay moist in the oven. 

This 'Winter Luxury' pumpkin half needs to be cleaned and the seeds saved for roasting.

This 'Winter Luxury' pumpkin half needs to be cleaned and the seeds saved for roasting.

These inverted pumpkin halves are ready to roast or steam.

These inverted pumpkin halves are ready to roast or steam.

After cooking and cooling, scoop the pumpkin shells out and put the flesh in a blender or food processor and process it until smooth. This should take a minute or two. Now the mash is pie-ready.

The pumpkin should be completely soft and easily scooped when fully cooked.

The pumpkin should be completely soft and easily scooped when fully cooked.

A blender or food processor is the best way to make doubly sure your mash is perfectly smooth.

A blender or food processor is the best way to make doubly sure your mash is perfectly smooth.

Pumpkin pie filling is lightest if blended in a food processor or blender, so be sure to keep yours on hand for making this pie.


Rich Pumpkin Pie

Ingredients

3/4 cup white sugar

1 teaspoon ground cinnamon

1/2 teaspoon salt

1/2 teaspoon ground ginger

1/4 teaspoon ground cloves

1/4 teaspoon ground nutmeg

2 large eggs (room temperature)

2 cups smooth pumpkin mash

1 cup evaporated milk, half-and-half or heavy cream

1 prebaked 9-inch deep-dish pie shell (Makes one pie)


Directions

Preheat the oven to 350 degrees Fahrenheit. Throw all the spices and wet ingredients into the blender and blend until smooth and well-mixed. Pour into a prebaked pie shell and bake for around 45 to 50 minutes or until the pie's custard center is no longer jiggly; you should be able to insert a toothpick in the center and have it come out clean. Once you can smell the pie, it's time to check it. Once the pie is cool, cut a slice and hit it with a mountain of fresh whipped cream.

Bake the pies until firm and fragrant.

Bake the pies until firm and fragrant.

The completed pumpkin pie among other Thanksgiving desserts.

The completed pumpkin pie among other Thanksgiving desserts.

Growing Kohlrabi

The pretty purple bulbs of kohlrabi 'Kohlibri' are easy to grow, delicious, and worth the 45-day wait.

The pretty purple bulbs of kohlrabi 'Kohlibri' are easy to grow, delicious, and worth the 45-day wait.

Spring and fall are the best times to grow sweet, cabbagy kohlrabi, which thrives and tastes better in cool weather. Like so many brassicas, this odd looking vegetable is of the species Brassica oleracea with the group name "Gongylodes", a name that translates to "round" or "swollen" in Latin. This refers to its round, edible, bulbous stem that looks much like an above-ground turnip. In fact, another common name for this veggie is "turnip cabbage."

There are quite a few appealing kohlrabi varieties available to gardeners. The giant green 'Kossak' is my favorite because its bulbs stay crisp and are slow to get fibrous and woody (a problem with many kohlrabi variants). Some also stand by the massive, green 'Gigante', but in my experience the bulbs get fibrous fast. The smaller, flavorful varieties 'Winner' and 'Grand Duke' are also super sweet and stay crisp, but both are plain green. That's where the vivid purple 'Kolibri' reigns supreme. No kohlrabi is prettier at market, and the crisp fiberless flesh has a wonderful balanced sweetness. It grows quickly, too. (To learn more about kohlrabi varieties, check out Cornell's Kohlrabi Trials.)

Here are the basics for knowing and growing this fine cool-season veggie:


Common Name: Kolibri Kohlrabi

Botanical Name: Brassica oleracea (Gongylodes Group) ‘Kohlibri'

Days to Harvest: 45

Light: Full sun

Soil: Rich, friable loam

Common Problems: Cabbage loopers, damping off caused by Pythium and Phytophthora fungi, heat (causes woodiness and bolting), slugs, snails.

Planting Time: Late February for spring crops and late August for fall crops. Southerners can plant in October for winter crops.

Days to Harvest Timeline

Starting Seeds: Start plantlets indoors for best results. Sow seeds in cells filled with seedling mix and lightly sprinkle a bit on top to cover. Gently moisten the cells with water and place right under the warmth of grow lights. In 5 to 10 days your kohlrabi seeds should germinate. Germination is best in cool temperatures (50° and 60° Fahrenheit (10-15° Celcius)). (For more details visit my Black Gold seed starting post.)

Tending Seedlings: Kohlibri kohlrabi seedlings have purplish seed leaves with two lobes. True leaves start to appear in 2 to 3 days. Continue to keep plants lightly moist and lightly feed with diluted all-purpose fertilizer once the seed leaves have appeared. To avoid leaf burn, lift grow lights up as seed leaves get closer to the bulbs. (*Grower's warning: wet soil can encourage fungal disease and cause seedlings to rot or "damp off.")

This 2.5 inch seedling will be ready for outdoor planting in another 5 to 7 days.

This 2.5 inch seedling will be ready for outdoor planting in another 5 to 7 days.

Moving Small Plants: Small plants have purplish leaves and stems and should be around 3 to 5 inches tall and garden ready after 14 days. Before planting, amend and turn the soil with rich compost and organic granular fertilizer formulated for vegetables. Plant between 8 and 12 inches apart. Keep plants moist, not wet. After another 8 to 10 days they should begin to bulb up at the base. (*Grower's warning: this is the time when plants are most vulnerable to pests. Protect from cabbage loopers with BT (Bacillus thuringiensis), which is approved for organic gardening.)
 powder.)

Harvesting Mature Plants: In 45 days the tender bright purple 'Kolibri' bulbs should be ready to cut from the base and harvest. Ready bulbs should be between 2.5 to 4 inches across. With a harvest knife, neatly cut plants at the root, take off top leaves, bag and store in the
 refrigerator. These 2.5 to 3 inch bulbs are very tender and just ready to harvest.

Preparing Kohlrabi: All bulbs should be lightly peeled before cooking or eating unless their skins are exceedingly tender. My German husband likes to chop kohlrabi into cubes and cream it with a spicy nutmeg cream sauce (roux, whole milk or cream, nutmeg, salt, pepper and hot sauce). This is delicious.

The bulbs can also be eaten raw. My good gardening friend, Ann Mattingly, grew up eating kohlrabi bulbs like apples and advocates chopping the bulbs into raw sticks and dipping them into hummus. Another tasty raw option is to julienne the bulbs on a mandolin and add them to salads as you would shredded cabbage.

Excessive rain caused this ready-to-harvest bulb to crack, but it was still crisp and tasty.

Excessive rain caused this ready-to-harvest bulb to crack, but it was still crisp and tasty.


Begonia boliviensis and Its Hybrids

The unique, elegant beauty of the tuberous begonia species, Begonia boliviensis (Bolivian Mountain Begonia) is unmatched. It's pendulous, slender, vase-shaped blooms are bright orange, almost beak-like, and cascade down the plant in a sweep of color alongside sprays of small, deep green, angelwing-type leaves. Mature plants develop a pleasing bushy habit and can reach up to three feet (1 meter).

The pendant flowers of Begonia boliviensis dangle like summer jewelry and look best in containers or hanging baskets.

The pendant flowers of Begonia boliviensis dangle like summer jewelry and look best in containers or hanging baskets.

Culture of this Bolivian native is like that of most other tuberous begonias. Partial sun is preferred as is fertile, moisture-retaining medium with very good drainage. It grows from USDA hardiness zones 8 to 11, though there are reports it can overwinter in zone 7 with protection. Where hardy, it's late to break dormancy, particularly in zone 8. In colder climates, it's best to overwinter the tubers or container-grown plants in a cool garage.

Begonia boliviensis will tolerate humidity and moderate summer heat, though it prefers milder summer weather (most plants from mountainous areas do). Water it regularly. Container-grown specimens are always more demanding of water and require daily applications. Fertilize regularly to encourage continuous flowering. This is a self-cleaning ornamental, which means it does not require deadheading. It's fairly pest and disease free, however tuber and stem rot can occur if soil drainage is not adequate. This is a fairly easy plant to grow from seed. Start the tiny, dust-like seeds early (six months in advance) to give them a head start for the growing season.  (Swallowtail carries the seed.) Full sized plants are far more expensive, so I usually opt for seed route if I want more than one plant.

The cultivar 'Bonfire' is an extra vibrant selection with larger flowers and a slightly more compact habit.

The cultivar 'Bonfire' is an extra vibrant selection with larger flowers and a slightly more compact habit.

There are lots of other great cultivars and hybrids hitting the garden market. The most common of these is the more compact, large-flowered 'Bonfire'. The hybrids in the Mandalay Series also have boliviensis parentage and their flowers show it. They are also compact and come if shades of white, pink and orange. Mandalay Flamingo is a pink-flowered boliviensis hybrid that's offered through Proven Winners. Mandalay Pearl is another nice selection with its neutral flowers that will blend well with any container arrangement.

Friends will ask about these begonias if you plant them in your beds or containers. They're that impressive and with good care they'll shine all season into fall, no problem.

Begonia Mandalay Pearl

Begonia Mandalay Pearl

Begonia Mandalay Flamingo

Begonia Mandalay Flamingo


Old Kitchen, New Kitchen, Yellow Kitchen, Blue Kitchen

Ten years. It took me ten years to convince my partner that our boxy, counterspaceless, maize-plastic-tile-coated kitchen from hell (above) was not a good thing. It was hard to cook in, unlovely, and continued to look unclean after hours of scrubbing. Throw in spots of melted floor linoleum and shriveled wall tiles from a hot pan mishap, and the miserable kitchen picture was complete. But somehow he stood unconvinced and maintained an attachment to its amalgam of 1930s charm and 1960s and 1970s fugly remuddling. And my subtle and not-so-subtle complaints didn't make a dent. I needed a new approach.

I began perusing home listings and suggested we simply buy a new home with a new kitchen. This tactic proved wonderfully effective. After a month or so of "new house searches" I was told I could have my kitchen, but it was my project. I didn't realize what I was taking on.

IMG_7130.JPG

Even if you find a great designer/contractor, which we did (plug for Oz Seaton at Oz Creations), it is a lot of work. And the pickier you are, the harder it is.

In addition to being unskilled in kitchen design, I am picky. A bad combination. Decision making took months, while the project took under a month to complete--fast for kitchen remodeling standards. Still, the process was an education. If I could do it again, I'd approach it with a lot more savvy.

The design process took several sessions with our designer/contractor. Our small kitchen was enclosed by a non-load-bearing wall that divided the kitchen and dining room. He suggested we remove the wall, and in its place he designed a spacious island. (OMG, I actually have enough counter space to roll cookie and pie dough now!) An additional set of cabinets were added that wrapped into the dining room. The combination gave the whole space a much bigger look as well as more storage space.

Our house was built in the 1930s and maintains a Craftsman-like feel with its wall-to-wall golden oak floors and quaint spaces, so a modernish Craftsman look is what I went for. For cabinets, we chose a Kraftmaid semi-custom solid door in cherry (honey spice glaze) with a thick-square-edged, recessed panel. The honey color blends beautifully with the existing dining room floors and furniture pieces. (We've gotten nothing but compliments.) For counters we chose an attractive matching granite with streaks of warm tan, blue-gray and black.

Handmade ceramic subway tiles from Clay Squared to Infinity (Minneapolis, MN) were chosen for the backsplash. The rustic tiles come in lots of homey colors. I chose the variable blueish North Shore glaze, which looked a lot lighter in sample than what was finally delivered. Still, the end result looks pretty, though a bit darker than anticipated. To match the backsplash, I chose a pretty suite of decorative tiles in a mountain motif from Ravenstone Tiles (Port Townsend, WA) to set above the stove.

Ravenstone landscape tiles

Ravenstone landscape tiles

Flooring was the hardest to choose. Our designer logically suggested easy-clean, no-break laminate options while I wanted something stone, Craftsmanesque, totally indestructible for my destructive family, and harder to install. After ordering loads of tile samples and visiting flooring store after flooring store, I fixed on 12"x 12" tiles of Brazilian blue slate. These were then hand cut and set into a groovy hopscotch pattern by our designer and a matte seal was applied to maintain the natural look of the slate. The end result is beautifully tough. I love the cool, natural feel of the stone on my bare feet in summer. (In cold weather I'll wear slippers.) It shreds sponge mops, but it's a downside I can live with.

There were lots of other bits and pieces to pull together. For cabinet hardware, I chose super cool oiled bronze knobs and handles from Craftsman Hardware. The surprise is that their solid, true-to-period hardware is higher quality and less money than the cheesy stuff offered by Kraftmaid. Hanging pendant lamps for the island came from Cal Lighting, though one came damaged, and we are still waiting for a replacement.

Bronze, oil-rubbed, pyramid handle by Craftsman Hardware

Bronze, oil-rubbed, pyramid handle by Craftsman Hardware

By the time demolition started, nearly all the pieces were in place. It took around three and a half weeks to complete--very efficient and pain-free. During the final two weeks of work we were on vacation and returned to a lovely new space. A few odds and ends still need to be completed, but that is to be expected.

In the end, the room was finished off with paint, I bought some red-enameled island stools, and so on. For paint, our designer chose Analytical Gray, a neutral, taupish, Sherwin Williams offering. Additionally, I painted the adjoining pantry room a bright teal (Caruso by Olympia) to contrast with my collection of candy-colored antique mixing bowls. The flashy teal also creates a background pop of color to set off the more subdued hues of the new kitchen.

We're glad to have a nearly complete beautiful new kitchen. Now on to our corroding, cracking, aged bathrooms.

Homemade Garlic Sambal

We eat a lot of sambal, a spicy Southeast Asian chile-based condiment. At its heart, it simply contains chiles and salt, but other ingredients can be added to liven it up, such as garlic, vinegar and sugar.

I made my own version of garlic sambal with a couple surprise (non-traditional) ingredients. The result is really good, though I also credit the positive outcome to the quality of the fresh-picked chiles from my garden.  The peppers chosen ('Hot Portugal' and red jalapeños) are only moderately hot, so this sauce can be eaten like a spicy, slightly sweet, garlicky ketchup. I make small batches, but the recipe can be doubled.

Ingredients

1 pound fresh, red chile peppers, whole with tops removed

2/3 cup apple cider vinegar

1/3 cup water

1 tablespoon agave syrup

1 small apple, peeled and sliced

3 large cloves garlic, peeled

1 teaspoon salt

Steps

Add the chiles to a medium saucepan and put on medium to medium-low heat. Add 1/3 cup of the vinegar, salt, and cover. Cook the chiles for around 15 minutes or until they have softened. Next add the water, remaining 1/3 cup of vinegar, agave syrup and apples. Cover and cook for another 15 minutes or so until the apples have softened and the liquid has reduced.

Allow the mix to partially cool. When it's still warm, transfer it to a blender or food processor along with the fresh garlic cloves. Mix it until smooth, then taste. Adjust the flavor with more agave syrup and salt as needed. If it's too thick, add a little water or vinegar. Place in a lidded glass jar and refrigerate.

Use as a condiment or as an addition to marinades and sauces.

A mix of moderately hot chiles with one 'Cortland' apple--my twist on the recipe.

A mix of moderately hot chiles with one 'Cortland' apple--my twist on the recipe.

Baby Bouquets

Miniature bouquets are my girl's favorite new thing. They gather small jars, bottles, egg cups and little vases and fill them with whatever flowers they can find in the garden. Then we place the flowers in a 20% Sprite, 80% water solution for food. This is a great way to teach kids that flowers last longer with food, and surprisingly watered lemon soda is nearly perfect stuff. The citric acid keeps the stem vasculature open and deters bacterial and fungal growth while the sugars provide the flowers with needed energy. It's a fun lesson.


Today's bouquets were particularly photo-worthy.

IMG_1029.JPG


A Pricklypear Situation

Hardy cacti? Believe it or not, yes! It’s true that most of these prickly succulents are not winter hardy, but a few oddballs have adapted to thrive in even the coldest parts of the country. Some of the best are Opuntia species, commonly known as pricklypears. These plants offer lovely spring flowers and striking, paddle-shaped stems that lend interest in a number of sunny garden situations, from rock gardens to exotic container plantings.

The red fruit and unique habit of Opuntia phaeacantha looks striking next to the rich fall colors of tall sedums.

The red fruit and unique habit of Opuntia phaeacantha looks striking next to the rich fall colors of tall sedums.

Opuntia is a diverse and widespread genus of 150-200 species existing from Canada down to Argentina. They’re most easily characterized by their paddle-shaped, photosynthetic stems (joined and extended in segments), large, showy flowers and bulbous red fruit that clusters along the paddles late in the season. As many people might expect from a cactus, Opuntia spines are pointy, but they’re more unique than those of your average cacti. The needles are sharp and long, and the areoles (sites where the spines arise) have clusters of glochids – minute, brittle, barbed spines that detach easily and become embedded in the skin. (Ouch!)

Of all the Opuntia species, only several are adapted to colder climates. They exist in more northerly states or at higher altitudes and have physiological adaptations that enable them to fight the cold. When temperatures begin to drop toward freezing, the plants’ pads lose water and appear to deflate. This water loss protects the plants from freezing damage. The pads also turn from bright green in summer to shades of reddish-brown and burgundy in winter – a color change that lends protection from winter sun damage.

Hardy pricklypears aren’t always the easiest to find, but a few are commonly available and highly garden-worthy. The more popular and available plants are usually the best for budding cactus enthusiasts to try. Here are four hardy species worth considering:

The pale yellow flowers of Opuntia fragilis are delicate and beautiful.

The pale yellow flowers of Opuntia fragilis are delicate and beautiful.

Opuntia fragilis (brittle pricklypear). Featuring creamy-yellow summer flowers, Opuntia fragilis is the hardiest of all the pricklypears. This remarkably cold-tolerant species is native to grasslands, limestone outcrops, gravely sites and alpine and subalpine regions as far north as northern British Columbia in Canada. It’s distinguished by smaller, slightly rounded pads and is commonly found growing on rocky outcrops, so it’s perfect for rock gardening. Unlike nearly every other Opuntia species, brittle pricklypear can take light shade, and even though it grows in the coldest of regions, it can also take some heat.

The golden blooms of Opuntia humifusa offer heavy loads of pollen and nectar.

The golden blooms of Opuntia humifusa offer heavy loads of pollen and nectar.

The beautiful and prolific Opuntia humifusa (devil’s tongue) is the most common of the hardy pricklypears. It can be found in drier, rocky or sandy sites east of the Rockies. Those living along the Atlantic Coast may be familiar with devil’s tongue because it’s native to coastal plant communities and often planted due to its remarkable tolerance to salt, wind and high heat.

In late spring or early summer, devil’s tongue produces lots of large, bright yellow or orangish-yellow flowers along its pads. These glow in the sun and are favored by bees, which become covered in the dusty, yellow pollen of their anthers. By fall, deep red fruit appears along the pads and persists into winter. As this pricklypear ages, its pads drop to the ground and root, so over time a single plant can form a substantial clump.

The name Opuntia phaeacantha (tulip pricklypear) sounds ornamentally promising, doesn’t it? The tulip-shaped flowers of this hardy, western pricklypear bloom in late spring or early summer. Floral color varies widely and may be yellow, apricot, pink or red. (Those in the pink and red range are the most striking and interesting.) All offer red fruit in fall. The broad pads are armed with fierce spines that are as painful as they are visually interesting. There are several notable cultivars to choose from, including the apricot-flowered ‘Plum’ and the orangish-coral-flowered ‘Persimmon’ – both hybrids created by Claude A. Barr, a Great Plains cattleman and noted native plant hybridizer.

Dense areoles and spines cover the pads of the prickly wonder, Opuntia polyacantha (plains pricklypear). Large, chalice-shaped flowers of clear yellow or orangish-red appear in late spring or early summer, and brownish-red fruit follows later in the season. Hardiness level depends on where the plant comes from. Its native distribution extends from western Texas all the way up to Alberta, Canada.

With minimal care and effort, you can have a handsome Opuntia planting. The best way to start growing these great plants is in a  trough or large container. Full sun and coarse, sharply drained soil with a neutral pH is needed for best growth and flowering. Top-dress the soil’s surface with natural-looking pebbles for a clean, attractive look. As with all sharp and potentially dangerous plants, pricklypears should always be handled with thick, rose gloves and planted away from areas where small children and pets play – yet still kept in a spot where they can be enjoyed for their unique, striking beauty.